CONTENTS:
CONTENTS:
Have you ever found yourself in this situation: the Chief Muckety Muck at work purchased an expensive laser copier/printer/imaging machine for the office.
It works great . . .for a while. But eventually things don’t work as well as they used to.
Chief Muckety Muck doesn’t care — he or she paid for a high-quality printer, but they’re no longer getting high-quality prints.
It’s up to you to get that machine running as good as it once did.
Welcome to Printer Maintenance 101!
Start Simple
How do you know if a printer needs routine maintenance?
Well, if it’s routine, you kind of do it on a regular schedule, right?
I know, giving your printer a check-up from the neck up isn’t on the top of your priority list.
However, if you start to see lines, smears, or missing colors on your prints, it’s time for a printer maintenance plan!
Roll up your sleeves, Sally! You’re getting your hands dirty!
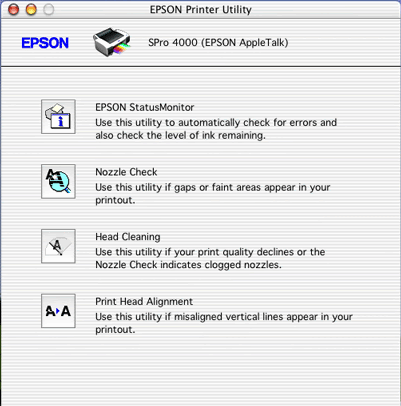
Step 1: Run A Nozzle Check
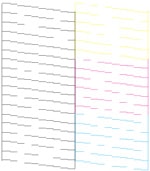
Use your printer software utility to run a nozzle check. Your printer will print test page that looks something like this.
Solid lines show that print head is clean:

Broken lines and blank parts mean print head needs cleaning:
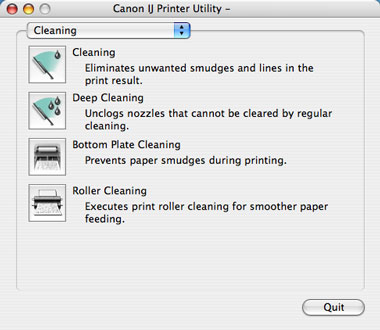
Step 2: Clean Your Print Heads
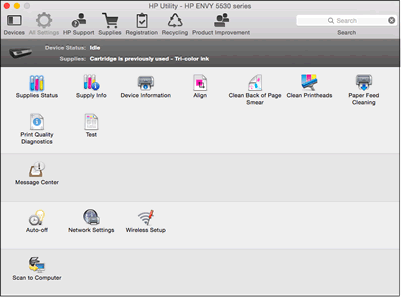
Use your printer software utility to run an automated print head cleaning.
Step 3: Align Your Print Heads
Use your printer software utility to align your print heads.
Step 4: Unplug Your Printer
If the first three steps don’t solve your printing problems, it’s time to venture inside your printer. Just make sure you unplug is first. Don’t risk an electrical shock!
Step 5: Clean The Inside
Laser printers get dirty with toner dust and paper remnants.
It’s like a printing supplies graveyard inside your printer!
However, both the inside and outside of the printer can be wiped down with a damp or lint-free cloth.
Be gentle! Try using a brush with soft bristles, and/or a moist Q-tip to remove stubborn dirt.
Step 6: Beware The Vacuum
Don’t use a normal vacuum cleaner or compressed air.
This can damage printer parts, both during inkjet printer maintenance and laser printer maintenance.
Step 7: Clean Your Print Heads (Again)
You can extend the life of your office equipment by learning how to clean printer components, like how to clean printer heads.
It’s not difficult, and there are video guides, in addition to our blog, to walk you through it.
If you get messy, don’t freak out; we know how to get ink and toner stains off your hands and clothes!
Step 8: Clean The Paper Feeder Rollers
Cleaning printer rollers isn’t hard.
All you need is a bit of isopropyl alcohol and a cotton rag to wipe the grime off the rubber feeder rollers.
Printer roller cleaning helps the rollers maintain the rubbery grip they need to move pages along smoothly through the printer.
One pro user suggests soaking the middle of a piece of letter-size paper with rubbing alcohol, being careful to leave the edges dry.
Run this moistened sheet of paper through your printer two or three times to clear out ink or toner that had gotten on the paper feeder rollers.
Step 9: Use Original Cartridges
Don’t try to save a couple bucks by buying compatible ink and toner.
Use original, brand name cartridges for optimum printer performance.
You can always sell toners to us if you do not need them anymore.
Also, replace your ink cartridges before they completely run out.
Try to use your inkjet printer at least once a week to keep your ink from drying up.
If you don’t use your printer that frequently, turn it off when not in use.
Laser Printer Maintenance: Toner Troubleshooting
Printer still plagued with problems? Try these common troubleshooting tips:
Burry, Streaky, and Smeared Pages
Your toner cartridge may be the problem.
- Run several blank pages through the printer. This can clear loose toner particles that cause streaks.
- Open the lid on your laser printer and wipe down the laser scanner and mirror.
- Still got problematic prints? Take out your toner cartridge. Wipe it down and reinstall it. If problems persist, replace the toner cartridge with a new one.
- Still got problems. Wow. It’s time to replace your drum unit.
Faded Prints
This is probably a sign your toner is low. Time to replace that toner cartridge!
If this doesn’t work, the problem may be a transfer roller issue. Also, clean the laser mirror.
Spotty Prints
Blank spots on your printouts?
You may have a damaged transfer roller or a bad toner cartridge.
Check inside your printer to see if there are any bits of paper or debris stuck to the rollers or caught in the transfer mechanism.
Run a test print once you clean the interior of the printer.
If you’re still getting blank spots, change your ink or toner cartridge. If the problem persists, you may need to replace the transfer roller.
Color Spotting On Black-and-White Prints
You’ve probably got a leaky color cartridge. You know what you need to do.
- Unplug your printer from the wall.
- Open it up, and remove the leaking cartridges
- Clean that mess up!
- Replace your color ink and toner cartridges with OEM originals
Half-Page Printouts
Sometimes the problem is software related.
- Restart both your printer and computer, and print a test page.
- If half-page printing persists, change the ink or toner cartridge
- If new ink and toner doesn’t work, replace the drum unit.
Update Printer Drivers
Always keep your printer up to date with the latest version of the driver software. These can be found on the website of the company that made your printer under the support tab.
Time For A Maintenance Kit
If printing problems persist, it may be time to order an OEM maintenance kit, which will help you clean the printer fan and other vulnerable parts that are prone to accumulating dust and residue.
Check the printer’s page counter to see if it’s time to perform more intensive maintenance.
An OEM maintenance kit for your laser printer will usually include a new fuser, transfer roller, and various feeder rollers, though the actual contents of the maintenance kit may vary from brand to brand.
Installing an OEM maintenance kit isn’t difficult — all you’ll need is a pair of latex gloves, a standard, flathead screwdriver, and a bit of patience.
We recently installed an HP printer maintenance kit on a 15-year-old HP Laserjet 4250.
We replaced the following parts in the following order, but even if you don’t have an HP 4250, the method should be similar on other laser printers.
Replace The Fuser
- Turn the printer off and unplug the power cord. If you used the printer recently, the fuser will be hot, so wait 30 minutes before performing any other tasks.
- Remove duplexer if you have one.
- Remove the output bin and the fuser.
- Open the rear output vent and then use a standard screwdriver to remove the vent, pushing on the hinge until the door pops off.
- Next, pinch the two levers on either side of the fuser until they release, and pull the fuser out.
- Push the new fuser into the back of the machine until the tabs click into place. Re-install the rear output vent door by working the pins back into the hinges.
Replace The Transfer Roller
- Remove packing strips from new cartridge and drum.
- Open the top cover and removed the toner cartridge
- Using the hooked end of the tool provided in the maintenance kit, (or the tip of your screwdriver) lift the left end of the transfer roller. Once it is out, slide it to the left and remove it.
- When installing the new transfer roller, do not touch the roller surface. Wear latex gloves and only handle the roller by the ends.
- Start by sliding the right end of the transfer roller into place and then work the left side gear down until it clicks into place.
Replacing the Tray One Pickup Roller
- Remove the front accessory cover.
- Locate the pickup roller at the center of the tray.
- Release the roller by pressing the clips on each side of the roller simultaneously.
- Slide new roller into place until it clicks.
- Replace front accessory plate. Reinstall toner cartridge and close the cover.
Replacing the Tray Two Pickup Roller
- Remove tray two.
- Locate the tray two pickup roller.
- Release the roller by pulling the tabs at either side of the roller, then slide the roller off the shaft.
- Slide the new roller onto the shaft and rotate the roller until it clicks into place.
Replacing Tray Two Separation Roller
- Install the tray two paper bin, leaving it half way out to allow access to the separation roller.
- Open the access door on the lower tray, exposing the roller.
- Remove the roller by pinching the two tabs at the end and pulling to the left.
- Install the new roller, turning until it locks into place.
- Close the access door.
- Close tray two.
- Plug your printer back in and turn it on. The main menu display on your printer should tell you new components have been installed and the printer may run some diagnostic testing to make sure they’re installed correctly.
Once your maintenance is complete it’s a good idea to run a laser printer calibration to make sure all of your colors or true.
Don’t forget to reset the page count back to zero once your maintenance is complete.
Your Friend, Your Printer Manual
Your printer manual is your friend, so keep it on an accessible nearby shelf.
This goes for Canon printer maintenance, HP printer maintenance, Brother printer maintenance…all the major printer manufacturers will provide a service schedule for your machine.
Eventually some mysterious maintenance light will pop on, and you’ll need the secret decoder ring inside your printer manual to figure it out.
Lose your printer manual? Shame on you! You’ll have to search the web for a PDF replacement.
Derek Swain
Thank you for mentioning how you should refrain from using a regular vacuum to clean your printer since doing so can damage some of your printer’s components. My uncle is thinking about starting an accounting business and needs to find a printer that is easy to maintain so that he can train his employees on how to clean it at the end of each week to ensure that too much dust doesn’t accumulate. Maybe he should find some office equipment that will work for his business.
Dick
Thank you for your article …. I use a Macintosh computer with the current software for Safari however the latest update did not include drivers for their vintage printers …. I have an apple 4-600 LaserWriter printer that works great gives great copies and is still working any suggestions or workarounds to find a driver for this printer… Also looking for suggestions for replacing it do not need color good quality ….Price range five to $800
Rob Errera
Ah, the Apple LaserWriter 4-600 is a classic beauty! They don’t make printers like that anymore, Dick! Unfortunately, Macs running OS10.6 or higher no longer support the Apple Talk protocol which your Apple IV LaserWriter requires. You may be able to find a workaround here, but it might be easier to buy a new monochrome laser printer, like the Brother HL-L2350DW or the HP LaserJet ProM15w. You can find more laser printer suggestions here. A new monochrome laser printer is relatively inexpensive, but it won’t last nearly as long as your classic LaserWriter!