CONTENTS:

CONTENTS:
You can only ignore the “replace toner” warning for so long. It’s time to learn how to replace toner in your Brother printer!
Fortunately, replacing toner on Brother printer is virtually plug-and-play.
Nevertheless, there are a few minute details to keep an eye on.
So, let’s go through the basics of removing old and installing new Brother toner.
What Makes Brother Toner Different
Brother toner is sold separately from the drum unit.
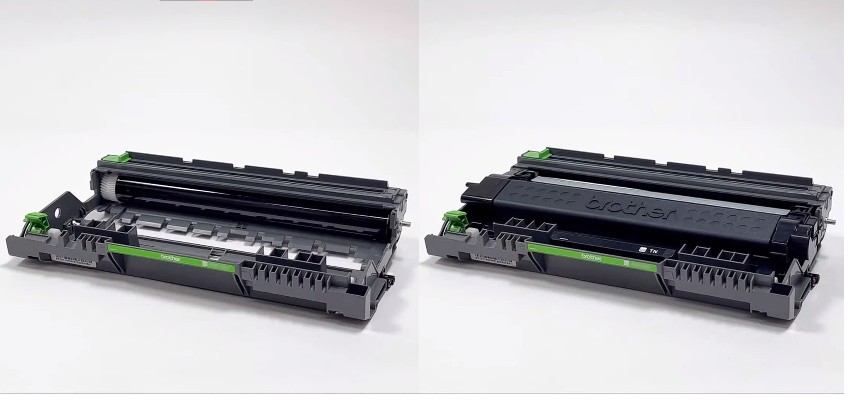
The toner needs to be detached from the drum unit, which you pull out of the printer first (like nesting dolls).
You’ll have to deal with Brother drum unit replacement somewhere down the line, but not as often as toner replacements.
It’s also important to note that you don’t need to buy both the drum unit and the toner every time.
Before Replacing Toner On Your Brother Printer
Toner doesn’t really expire – but you can run low sooner than you’d think.
Once your printer sends out the “Replace Toner” message, you can continue printing via the “Continue Mode”.
As soon as you go past the initial warnings, the print quality is bound to go down.
After that, as you continue using the printer, the messages go from “Toner Low” to “Toner Ended”.
But, if you’re in a hurry to print something before your new toner gets there, keep printing until you can visually detect the misprint.
Once your new toner arrives, it’s important to do a little setup before you make the switch. Here are a few general rules to follow:
- For optimal printing, try to always use genuine Brother toner for your printer.
- Unpack your new Brother toner only when you’re ready to install it.
- Take the new toner and remove all the packaging. Since toners are delicate tech, they’re often packed with extra cushioning. No extra parts, not even wrapping paper, should enter the toner drum unit.
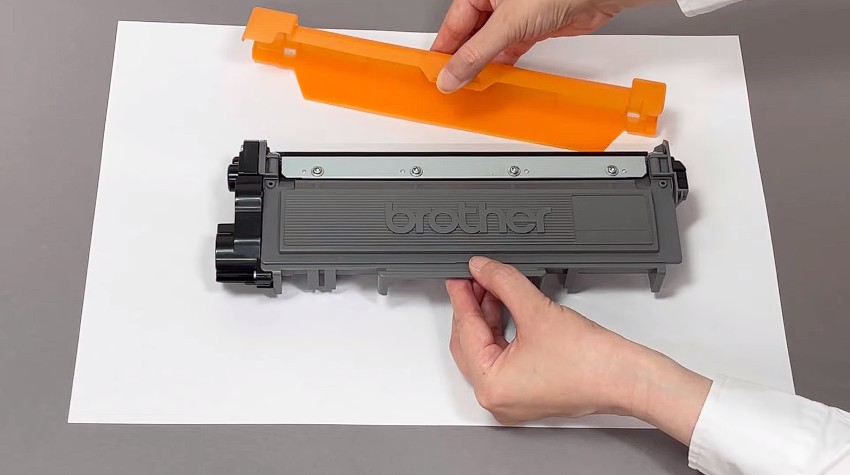
- Some toners come with an orange protective cover. Make sure to remove it, but not too long before the actual installation. Do this when you’re ready to slide the new toner in.
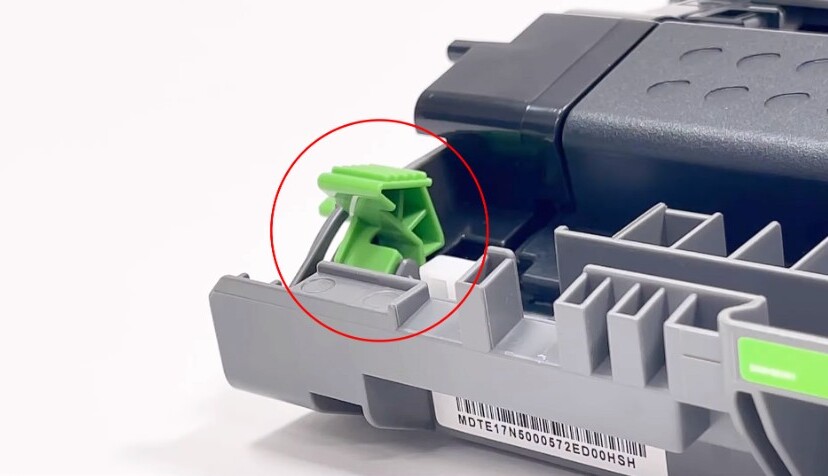
- Brother printers color-coded the parts users are meant to operate. Most maintenance latches and handless inside are colored light green.
- Lastly, before you’re ready to install it, lightly shake the toner, side to side.
- Recycle your old toner cartridges.
Brother Laser Printer Toner Cartridge Replacement
Ok, so it’s come down to the core part. Remember, there’s no need to rush the process.
Printer maintenance is user-friendly nowadays, so there’s no need for extra force or worry.
If a part isn’t sliding into its place right away, take it out and readjust it.
Let’s go through the process step-by-step:
1. Make Sure the Printer Is Turned ON
Brother printers come with onboard diagnostics (e.g. “Low Toner” warning).
Before you open the printer, make sure it stays on for at least 10 minutes.
Printer parts get quite hot, and the internal fans need time to cool them down so you don’t hurt yourself in the process.
2. Open the Front Cover
Some models have distinct green latches on the front, while others don’t.
Either way, the cover should come off easily after you press the release button.
Use mild force if needed, but don’t yank it if it’s stuck.
3. Pull the Drum Unit Out
The drum unit (with the old toner inside) is right behind the front cover.
Grab the green handle, and pull it out horizontally, while giving it a slight pull upwards as well.
The printer’s drum unit should slide right out.
4. Remove the Old Toner
Using the green clips on the side, pop the old toner out from the drum unit.
Be extra careful not to touch the drum rollers during the process.
The light-green or blue cylinder is the most sensitive part – try not to touch it.
5. Prepare Your New Toner
Take your new toner and make sure you removed all the packaging.
Make sure to remove the orange protective strip if your new toner has it (not all Brother toners come with it).
Give the toner cartridge a gentle horizontal shake, and insert it into the drum unit in the place of the old toner.
When you align the two pieces properly, the cartridge should simply click in place.
6. Clean the Corona Wire
Before you put the drum unit back in, clean the corona wire on the drum unit.
On the upper left side of the drum unit, you’ll see a green tab with a straight groove next to it.
Grab the green tab with your fingers and slide it all the way across the groove and back. Repeat three to five times.
Return the green tab to its designated spot in the corner of the drum unit.
You can see it demonstrated in the following video (03:38 mark).
7. Push the Drum Unit Back In
Your new toner should now be firmly attached to the drum unit.
Using the green handle again, slide the drum unit back into the printer.
You should hear a click that tells you the entire unit sat back in place correctly.
8. Repeat for Other Toners if Needed
If you own a color laser printer, replace the other color toners following the same steps – it’s rinse and repeat.
Just don’t tackle all of the colors at once – replace one after another.
9. Close the Front Cover
Once new toner (or toners) are set in their designated spot, close the cover.
10. DON’T Turn the Printer OFF Right Away
Once the printer is closed, it will run a self-diagnostic program.
Keep the printer on until it goes back to “Ready Mode”.
Brother Printer Toner Replacement – FAQ
1. Can I use my Brother printer after the initial “Toner Low” message?
Sure you can! Error messages are there to warn you of issues ahead of time.
The “Continue Mode” allows you just that – to print when the toner gets low.
However, once you go over this point, you can expect the print quality to drop.
When you print with low toner, your prints may look faded throughout the paper or in certain spots, or streaks may appear.
You can continue printing until the printer shows the “Toner Ended” or “Replace Toner” message on its display (if the model supports the feature).
Remember, you can recycle your old toner for cash once you replace it.
2. Did I replaced the toner on my Brother printer correctly?
The onboard diagnostics will do that for you.
After replacing toner on your Brother printer, you need to leave it on and wait for the “Ready” confirmation.
If something went wrong, the printer will let you know.
Do not turn the printer off right after toner replacement.
3. Do I need to replace the drum unit on my Brother printer?
On average (depending on the print volume, of course) you will have to change the drum every three or four toner changes.
The more you use your printer, the sooner you’ll need to replace the drum.
Easy Does It
Brother toner replacement is as easy as any other basic printer maintenance, with the caveat of the separated drum unit you need to take out first.
A few takeaways:
- make sure the printer is on for at least ten minutes,
- change the toner by taking out the drum unit first,
- clean the corona wire before you close up,
- and most importantly – don’t rush the process.
Good luck!
Further Reading:
- How To Clean Your Printer Rollers
- How to Recycle Toner Cartridges for Cash?
- How to Print Stickers – Everything You’ll Need To Get Started
CHERYL WILCOX
Printer does not recognize the new toner message Replace toner I have tried everything. How do reset the Drum? This has happened before and had some direction in the box Help please
Rob Errera
You’re using genuine Brother toner, right, Cheryl? Some printers will fail to recognize generic toner cartridges. You can learn more about resetting a Brother drum unit here, but I’m not sure that’s the problem. Try a hard reset by unplugging your printer from the wall and plugging it back in again.