CONTENTS:

CONTENTS:
You can only ignore the “replace toner” warning for so long. It’s time to learn how to replace toner in your Brother printer!
Fortunately, replacing toner on a Brother printer is virtually plug-and-play. Nevertheless, there are a few minute details to keep an eye on.
So, let’s go through the basics of removing old and installing new Brother toner.
What Makes Brother Toner Different
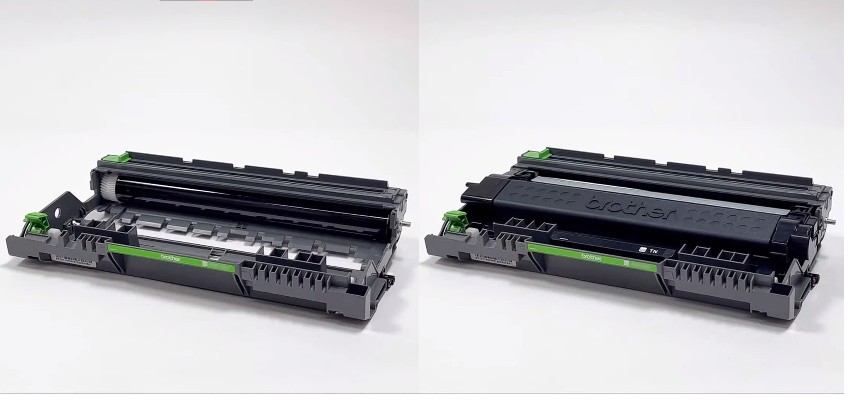
Brother toner is sold separately from the drum unit.
The toner needs to be detached from the drum unit, which you pull out of the printer first (like nesting dolls). You’ll have to deal with Brother drum unit replacement somewhere down the line, but not as often as toner replacements.
It’s also important to note that you don’t need to buy both the drum unit and the toner every time.
Before Replacing Toner On Your Brother Printer
Toner doesn’t expire, but it can run low quickly. After the “Replace Toner” message appears, you can still print using “Continue Mode,” though print quality may start to drop.
If needed, you can keep printing until you notice visible issues, but replacing the toner sooner helps maintain consistent results.
Before installing your new cartridge, keep these quick tips in mind:
- Open the new toner only when you’re ready to install it
- Remove all packaging and protective covers
- Avoid touching or inserting anything into the drum unit
- Follow the green-colored parts inside the printer for handling
- Gently shake the toner side to side before installation
- Recycle your old toner cartridge.
For optimal printing, try to always use genuine Brother toner for your printer.
Brother Laser Printer Toner Cartridge Replacement
Now, let’s walk through the toner replacement process step by step.
1. Make Sure the Printer Is Turned ON
Brother printers come with onboard diagnostics (e.g. “Low Toner” warning).
Before opening the printer, make sure it’s turned on and not too hot to handle.
If it was recently in use, let it cool down for a few minutes to avoid burns.
2. Open the Front Cover
Some models have distinct green latches on the front, while others don’t.
Either way, the cover should open easily after you press the release button.
Use gentle force if needed, but don’t yank it if it’s stuck.
3. Pull the Drum Unit Out
The drum unit with the old toner inside is located right behind the front cover.
Grab the green handle and pull it straight out. The unit should slide out easily.
4. Remove the Old Toner
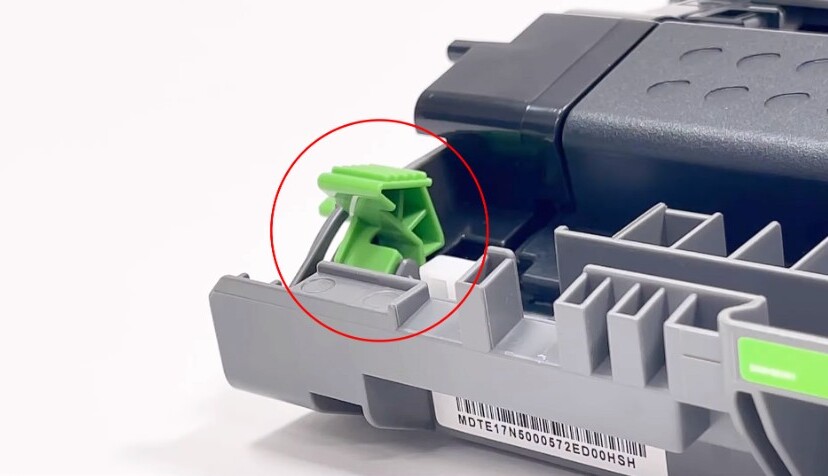
Using the green clips on the side, pop the old toner out of the drum unit.
Be careful not to touch the drum during the process. The light-green or blue cylinder is very sensitive, so avoid touching it.
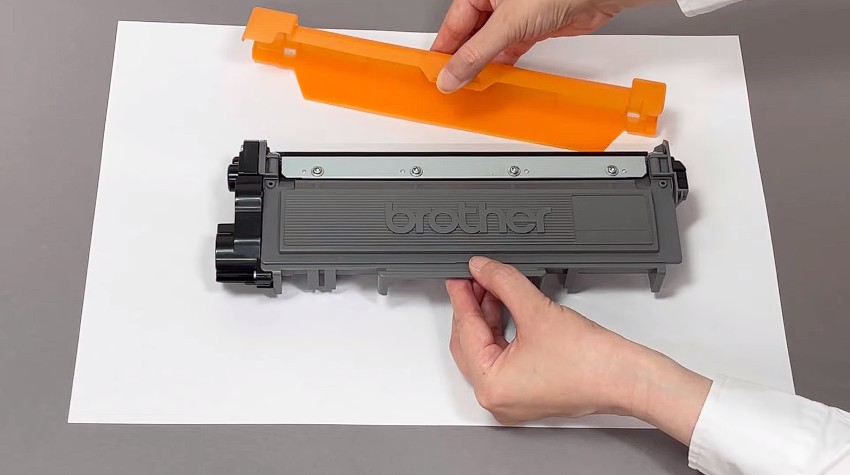
5. Prepare Your New Toner
Take your new toner and make sure all packaging has been removed.
Remove the orange protective strip if your toner has one, as not all Brother toners include it.
Give the toner cartridge a gentle horizontal shake, and insert it into the drum unit in place of the old toner.
When you align the two pieces properly, the cartridge should simply click in place.
6. Clean the Corona Wire
Before you put the drum unit back in, clean the corona wire on the drum unit.
On the upper left side of the drum unit, you’ll see a green tab with a straight groove next to it.
Grab the green tab with your fingers and slide it all the way across the groove and back. Repeat three to five times.
Return the green tab to its designated spot in the corner of the drum unit.
7. Push the Drum Unit Back In
Your new toner should now be firmly attached to the drum unit.
Using the green handle again, slide the drum unit back into the printer.
You should hear a click that tells you the entire unit sat back in place correctly.
8. Repeat for Other Toners if Needed
If you own a color laser printer, replace the other color toners following the same steps – it’s rinse and repeat.
Just don’t tackle all of the colors at once – replace one after another.
9. Close the Front Cover
Once the new toner (or toners) are set in their designated spot, close the cover.
10. DON’T Turn the Printer OFF Right Away
Once the printer is closed, it will run a self-check.
Keep the printer on until it returns to “Ready Mode”.
After that, your toner replacement is complete, and the printer is ready to use, so you can continue printing as usual.
FAQ
Why is my printer still showing “Replace Toner” after installing a new one?
This can happen if the printer didn’t recognize the new toner cartridge. Make sure the cartridge is seated correctly in the drum unit and that the protective cover is fully removed. Some models also require a toner reset procedure if the message persists.
What is the difference between toner and drum?
The toner cartridge contains the powder used for printing, while the drum unit transfers the toner onto the paper. They are separate parts in Brother laser printers.
Do I need to replace the drum when replacing toner?
Not every time. The drum lasts longer and is usually replaced after multiple toner changes, depending on usage.
Why won’t the toner click into the drum unit?
It may not be aligned correctly or could be the wrong model. Try reinserting it carefully and make sure it matches your printer type.
Should I shake the toner before installing it?
Yes, gently shaking the toner helps distribute the powder evenly for more consistent print quality.
Is it safe to touch the drum surface?
No, avoid touching the drum. It is sensitive and can affect print quality if damaged or contaminated.
What should I do if toner spills?
Clean it with a dry cloth or a vacuum designed for toner. Avoid using water, as it can make cleanup harder.
CHERYL WILCOX
Printer does not recognize the new toner message Replace toner I have tried everything. How do reset the Drum? This has happened before and had some direction in the box Help please
Rob Errera
You’re using genuine Brother toner, right, Cheryl? Some printers will fail to recognize generic toner cartridges. You can learn more about resetting a Brother drum unit here, but I’m not sure that’s the problem. Try a hard reset by unplugging your printer from the wall and plugging it back in again.